


PPC Load Balance MikroTik
สวัสดีครับ
วันนี้ผมจะมาเขียนเรื่อง PPC Load Balance mikrotik และอธิบายรูปแบบการคอนฟิก mikrotik คร่าวๆให้
สำหรับท่านที่จะเอา mikrotik ไปทำ loadbalance และทำ hotspot ครับ
อ้างอิง
http://wiki.mikrotik.com/wiki/Load_Balancing
ประเภทของ Load Balance ต่างๆ จะดูที่การแบ่งแบบ connection หรือ packet
ส่วนใหญ่ที่เห็นทำกันจะเป็น PPC
script จาก Manual:PPC
/ ip address
add address=192.168.0.1/24 network=192.168.0.0 broadcast=192.168.0.255 interface=LAN
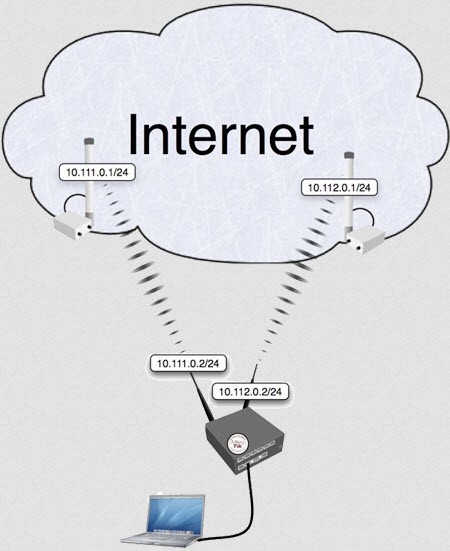
add address=10.111.0.2/24 network=10.111.0.0 broadcast=10.111.0.255 interface=ISP1
add address=10.112.0.2/24 network=10.112.0.0 broadcast=10.112.0.255 interface=ISP2
/ ip firewall mangle
add chain=prerouting dst-address=10.111.0.0/24 action=accept in-interface=LAN
add chain=prerouting dst-address=10.112.0.0/24 action=accept in-interface=LAN
add chain=prerouting in-interface=ISP1 connection-mark=no-mark action=mark-connection \
new-connection-mark=ISP1_conn
add chain=prerouting in-interface=ISP2 connection-mark=no-mark action=mark-connection \
new-connection-mark=ISP2_conn
add chain=prerouting in-interface=LAN connection-mark=no-mark dst-address-type=!local \
per-connection-classifier=both-addresses:2/0 action=mark-connection new-connection-mark=ISP1_conn
add chain=prerouting in-interface=LAN connection-mark=no-mark dst-address-type=!local \
per-connection-classifier=both-addresses:2/1 action=mark-connection new-connection-mark=ISP2_conn
add chain=prerouting connection-mark=ISP1_conn in-interface=LAN action=mark-routing \
new-routing-mark=to_ISP1
add chain=prerouting connection-mark=ISP2_conn in-interface=LAN action=mark-routing \
new-routing-mark=to_ISP2
add chain=output connection-mark=ISP1_conn action=mark-routing new-routing-mark=to_ISP1
add chain=output connection-mark=ISP2_conn action=mark-routing new-routing-mark=to_ISP2
/ ip route
add dst-address=0.0.0.0/0 gateway=10.111.0.1 routing-mark=to_ISP1 check-gateway=ping
add dst-address=0.0.0.0/0 gateway=10.112.0.1 routing-mark=to_ISP2 check-gateway=ping
add dst-address=0.0.0.0/0 gateway=10.111.0.1 distance=1 check-gateway=ping
add dst-address=0.0.0.0/0 gateway=10.112.0.1 distance=2 check-gateway=ping
/ ip firewall nat
add chain=srcnat out-interface=ISP1 action=masquerade
add chain=srcnat out-interface=ISP2 action=masqueradeตาม script ด้านบน เจอลูกค้าถามมาบ่อยมาก ว่าเอาไปใช้ยังไง อ้างอิงเอามาจาก wiki ของ mikrotik
ถ้าสามารถคอนฟิก Manual โดยใช้ mouse
คลิก + add ทำตามขั้นตอนแล้วไม่ยากครับ ใน script ยังไม่มี DHCP ต้อง add เพิ่มเอง ลองแปลงทีละส่วนกันครับ เนื่องจาก script เขียนมาจาก
Router OS ที่เป็น PC เค้าแทนเป็น interface ครับ
ผมใช้ ether1-ether3 ตามปกติได้สคริปท์ที่ export มาตามนี้ครับ
***เพิ่ม DHCP Server แล้ว
#ether1=10.111.0.2/24 Gateway 10.111.0.1
#ether2=10.111.0.2/24 Gateway 10.112.0.1
#ether3=192.168.100.1 dhcp range 192.168.100.2-192.168.100.254
#ether4=master port3
#ether5=master port3
#loadbalance PCC Ratio 3:1
/interface ethernet
set [ find default-name=ether4 ] master-port=ether3
set [ find default-name=ether5 ] master-port=ether3
/ip pool
add name=LAN-dhcp ranges=192.168.100.2-192.168.100.254
/ip dhcp-server
add address-pool=LAN-dhcp disabled=no interface=ether3 name=LAN
/ip address
add address=10.111.0.2/24 interface=ether1 network=10.111.0.0
add address=10.112.0.2/24 interface=ether2 network=10.112.0.0
add address=192.168.100.1/24 interface=ether3 network=192.168.100.0
/ip dhcp-server network
add address=192.168.100.0/24 gateway=192.168.100.1
/ip dns
set allow-remote-requests=yes cache-size=5000000KiB max-udp-packet-size=512 servers=8.8.8.8,8.8.4.4
/ip dns static
add address=192.168.100.1 name=router
/ip firewall mangle
add action=mark-connection chain=prerouting in-interface=ether1 new-connection-mark=ether1_conn
add action=mark-connection chain=prerouting in-interface=ether2 new-connection-mark=ether2_conn
add chain=prerouting dst-address=10.111.0.0/24 in-interface=ether3
add chain=prerouting dst-address=10.112.0.0/24 in-interface=ether3
add action=mark-connection chain=prerouting dst-address-type=!local in-interface=ether3 new-connection-mark=ether1_conn per-connection-classifier=both-addresses-and-ports:2/0
add action=mark-connection chain=prerouting dst-address-type=!local in-interface=ether3 new-connection-mark=ether2_conn per-connection-classifier=both-addresses-and-ports:2/1
add action=mark-routing chain=prerouting connection-mark=ether1_conn in-interface=ether3 new-routing-mark=to_ether1
add action=mark-routing chain=prerouting connection-mark=ether2_conn in-interface=ether3 new-routing-mark=to_ether2
add action=mark-routing chain=output connection-mark=ether1_conn new-routing-mark=to_ether1
add action=mark-routing chain=output connection-mark=ether2_conn new-routing-mark=to_ether2
/ip firewall nat
add action=masquerade chain=srcnat out-interface=ether1
add action=masquerade chain=srcnat out-interface=ether2
/ip route
add check-gateway=ping distance=1 gateway=10.111.0.1 routing-mark=to_ether1
add check-gateway=ping distance=1 gateway=10.112.0.1 routing-mark=to_ether2
add check-gateway=ping distance=1 gateway=10.111.0.1
add check-gateway=ping distance=2 gateway=10.112.0.1
/ip service
set telnet disabled=yes
set ftp disabled=yes
set www port=81
set ssh disabled=yes
/system clock
set time-zone-name=Asia/Bangkok
เทสว่าใช้งานได้หรือไม่
ผมเอา RB450G มา DHCP ที่ ether2 และ ether3 แล้ว limit ความเร็วไว้ที่ 20 Mbps/5Mbps (ตอนแรกทำไว้ 30 ครับ แต่ความเร็วเน็ตไม่ถึงเลยลดเป็น 20)
เทสโหลด driver nvidia ขนาดไฟล์ 238 MB

ดัดแปลงเป็น
-ความเร็วไม่เท่ากัน ทำยังไง
การแบ่งอัตราส่วนหรือกระจาย Ratio ทำเพื่อให้ใช้งานแต่ล่ะเส้นได้เต็มที่
ความเร็ว 200 กับ 100 แบ่งยังไง
วิธีคิดอัตราส่วน 200+100=300 เป็น 3 ส่วน=3/0,3/1,3/2 หรือ 150 กับ 75 มันก็สัดส่วนเดียวกัน
add action=mark-connection chain=prerouting dst-address-type=!local in-interface=ether3 new-connection-mark=ether1_conn per-connection-classifier=both-addresses-and-ports:3/0
add action=mark-connection chain=prerouting dst-address-type=!local in-interface=ether3 new-connection-mark=ether2_conn per-connection-classifier=both-addresses-and-ports:3/1
add action=mark-connection chain=prerouting dst-address-type=!local in-interface=ether3 new-connection-mark=ether1_conn per-connection-classifier=both-addresses-and-ports:3/2
100 กับ 10 บ้างล่ะ ก็ 11 ส่วน 11/0-11/9 ที่ ether1 ,11/10 ที่ ether2
พอนึกตามทันนะครับ
-มี hotspot ต้องเพิ่ม hotspot=auth ในส่วนของ Ratio ด้านบน
ถ้า Ratio มี 2 ส่วนก็เพิ่มแค่ 2 ที่ กรณีไม่ทำ hotspot จะไม่ติดหน้า login ถอด WAN ออกเส้นนึงติด
ลองทำดูนะครับ
วิธีที่จำทำให้เข้าใจสคริปท์ได้ไว
ผมใช้วิธี Print ออกมาแล้วเซตตามที่ละคำสั่ง
อันไหนไม่ได้ copy สคริปท์วาง แล้วดูตาม ลบทิ้ง เซตใหม่
แบบนี้จะเป็นไวและเข้าใจคำสั่งครับ ถ้าสงสัยหาข้อมูลใน WiKi ดูก่อนครับ ถ้าไม่มีพื้นฐานเลยอาจเข้าใจยากหน่อย
สคริปท์บางที่ เคยเจอวางยาด้วย คือ ใช้ chain=input หรือสลับลำดับใน firewall ใช้แล้วมันไม่รวม
ด้านบนผมอ้างอิงจาก wiki ใช้ได้ดีเลย ดัดแปลงจาก WAN=pppoe ก็แค่เปลี่ยนชื่อ interface
สงสัยเพิ่มเติมอันไหน
mail ถามได้ที่ support@nextgenit.biz ได้ครับ
support@nextgenit.biz
31/3/2017