
Load Balance ROS v7

สวัสดีครับ
วันนี้ผมจะมาเขียนเกี่ยวกับ ROS v7 กรณีทำ load balance เบื้องต้น
สำหรับ ROS v6 น่าจะหยุดอยู่ที่ 6.49.6 stable เพราะยังไม่มี update ออกมา
ส่วน v7 ล่าสุด 7.4 ออกเมื่อ 19 ก.ค.2022 14:25
ถ้ารุ่นที่เป็น ROS v7 มาจาก mikrotik เลย เช่น RB5009 Series,CCR2004 Series,CCR2216-1G-12XS-2XQ รุ่นพวกนี้จะเป็น CPU ARM 64 Bits
นอกนั้นจะเป็น ROS v6 อยู่ แต่สามารถ update เป็น ROS v7 ได้ครับ
แต่ข้อควรรู้ วิธีการ route มันเปลี่ยน อ่านรายละเอียดตามลิงค์ด้านล่าง
https://help.mikrotik.com/docs/display/ROS/Routing
ในหัวข้อวันนี้ผมจะใช้ config ตาม wiki ของ mikrotik กับ ROS v6.49.6 แล้ว update เป็น 7.4 stable ว่ามีอะไรเกินขึ้นบ้าง
https://wiki.mikrotik.com/wiki/Manual:PCC
โดยผมใช้ RB750Gr3 จำลองเป็น WAN
WAN1=192.168.101.0/24
WAN2=192.168.102.0/24
WAN3=192.168.103.0/24
WAN4=192.168.104.0/24
และจำกัดความเร็วไว้ที่เส้นละ 20 Mbps
ส่วนตัวที่จะเทส loadbalance คือ RB2011 WiFi เก่าเก็บ
ether1=รับ dhcp 192.168.101.254/24
ether2=192.168.102.254/24
ether3=192.168.103.254/24
ether4=192.168.104.253/24
ether5=Lan 192.168.10.1/24
โดย script ผมใช้ตาม wiki ตามด้านบนเลย
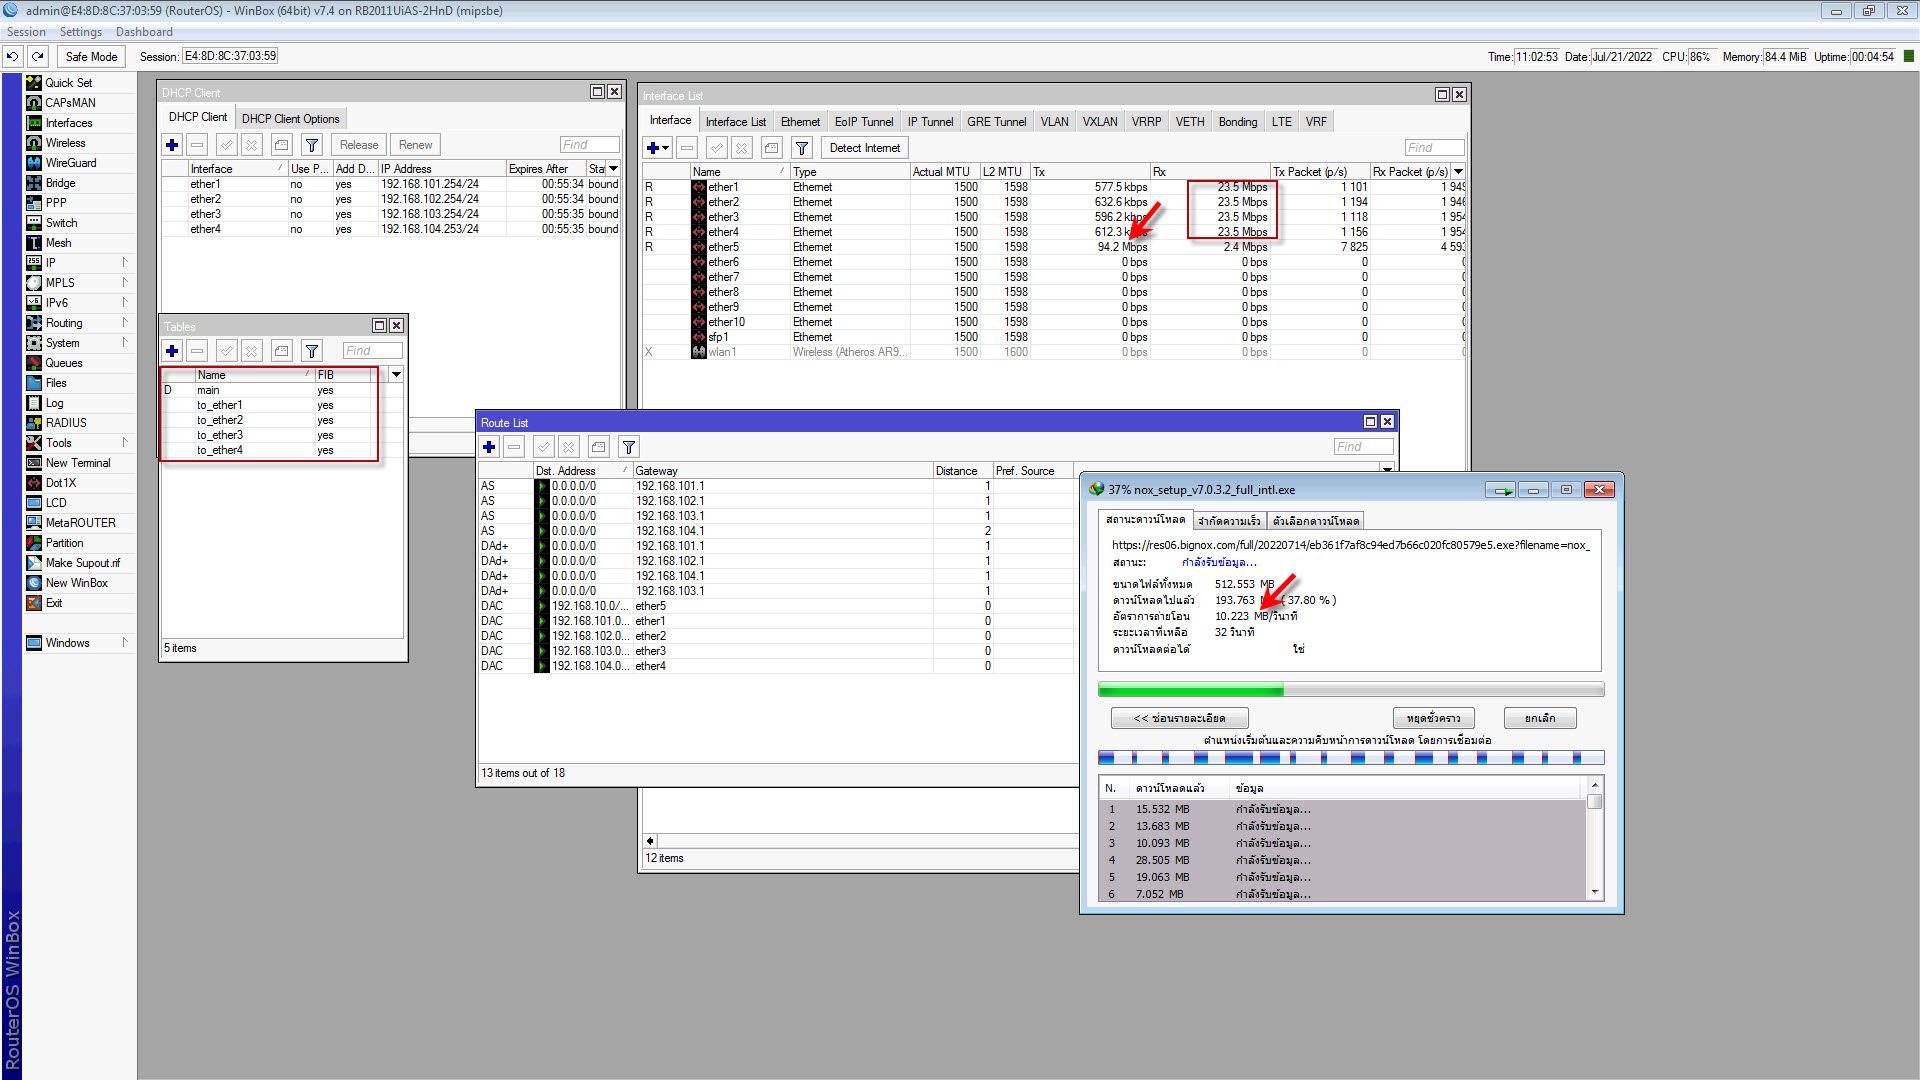
ทดสอบใช้ idm โหลดโปรแกรม nox ขนาด 512.55MB ความเร็วที่ได้ ถือว่าผ่านครับ วิ่ง 20.4 Mbps ทั้ง 4 เส้น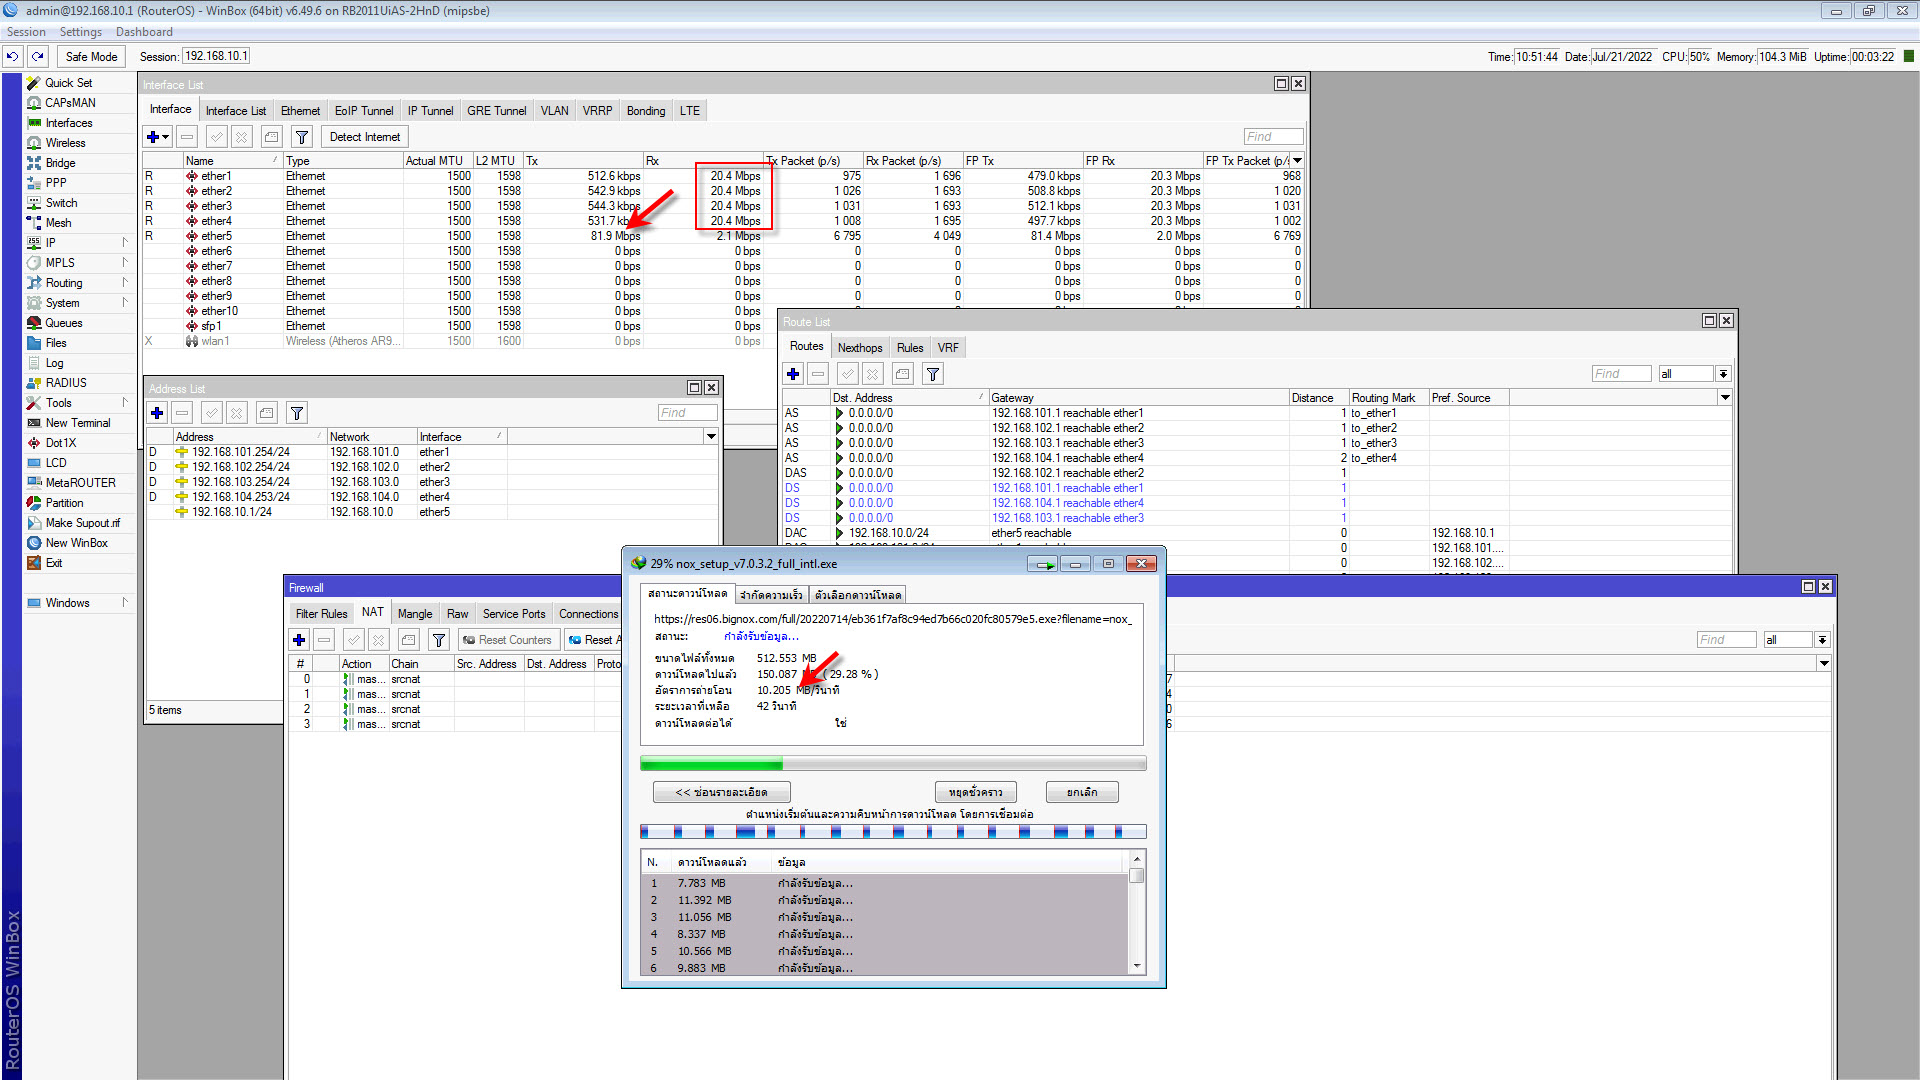
ลอง update เป็น 7.4 stable ดูครับ
อัพผ่านแล้ว อย่าลืม Upgrade Current Firmware ด้วยครับ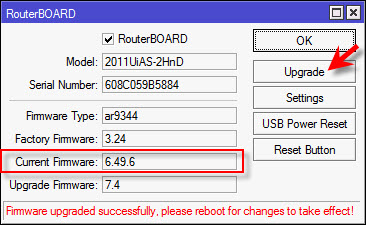
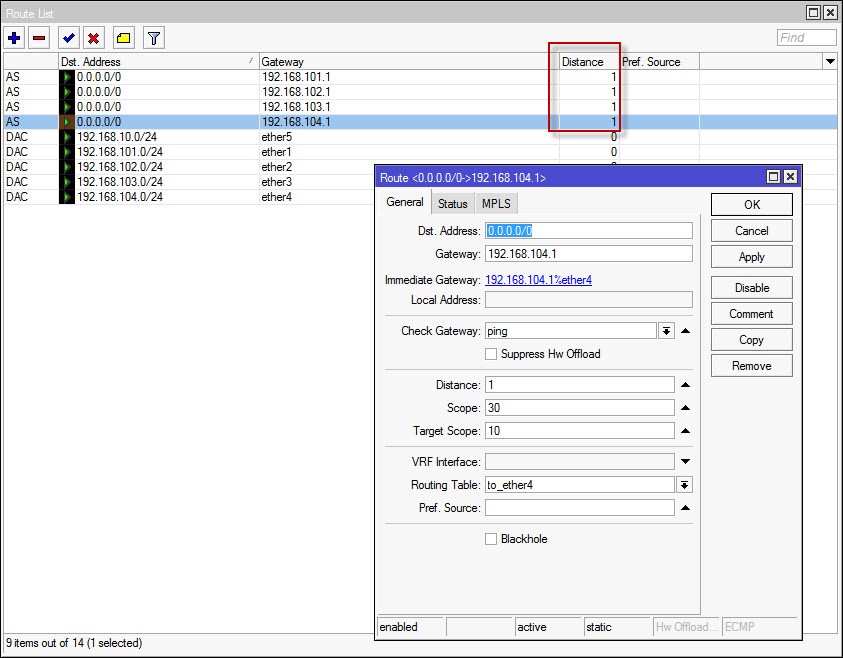
ความเปลี่ยนแปลง คือ route table ครับ
ลองกับโปรแกรมเพียร์ทูเพียร์หรือโหลดบิทครับ
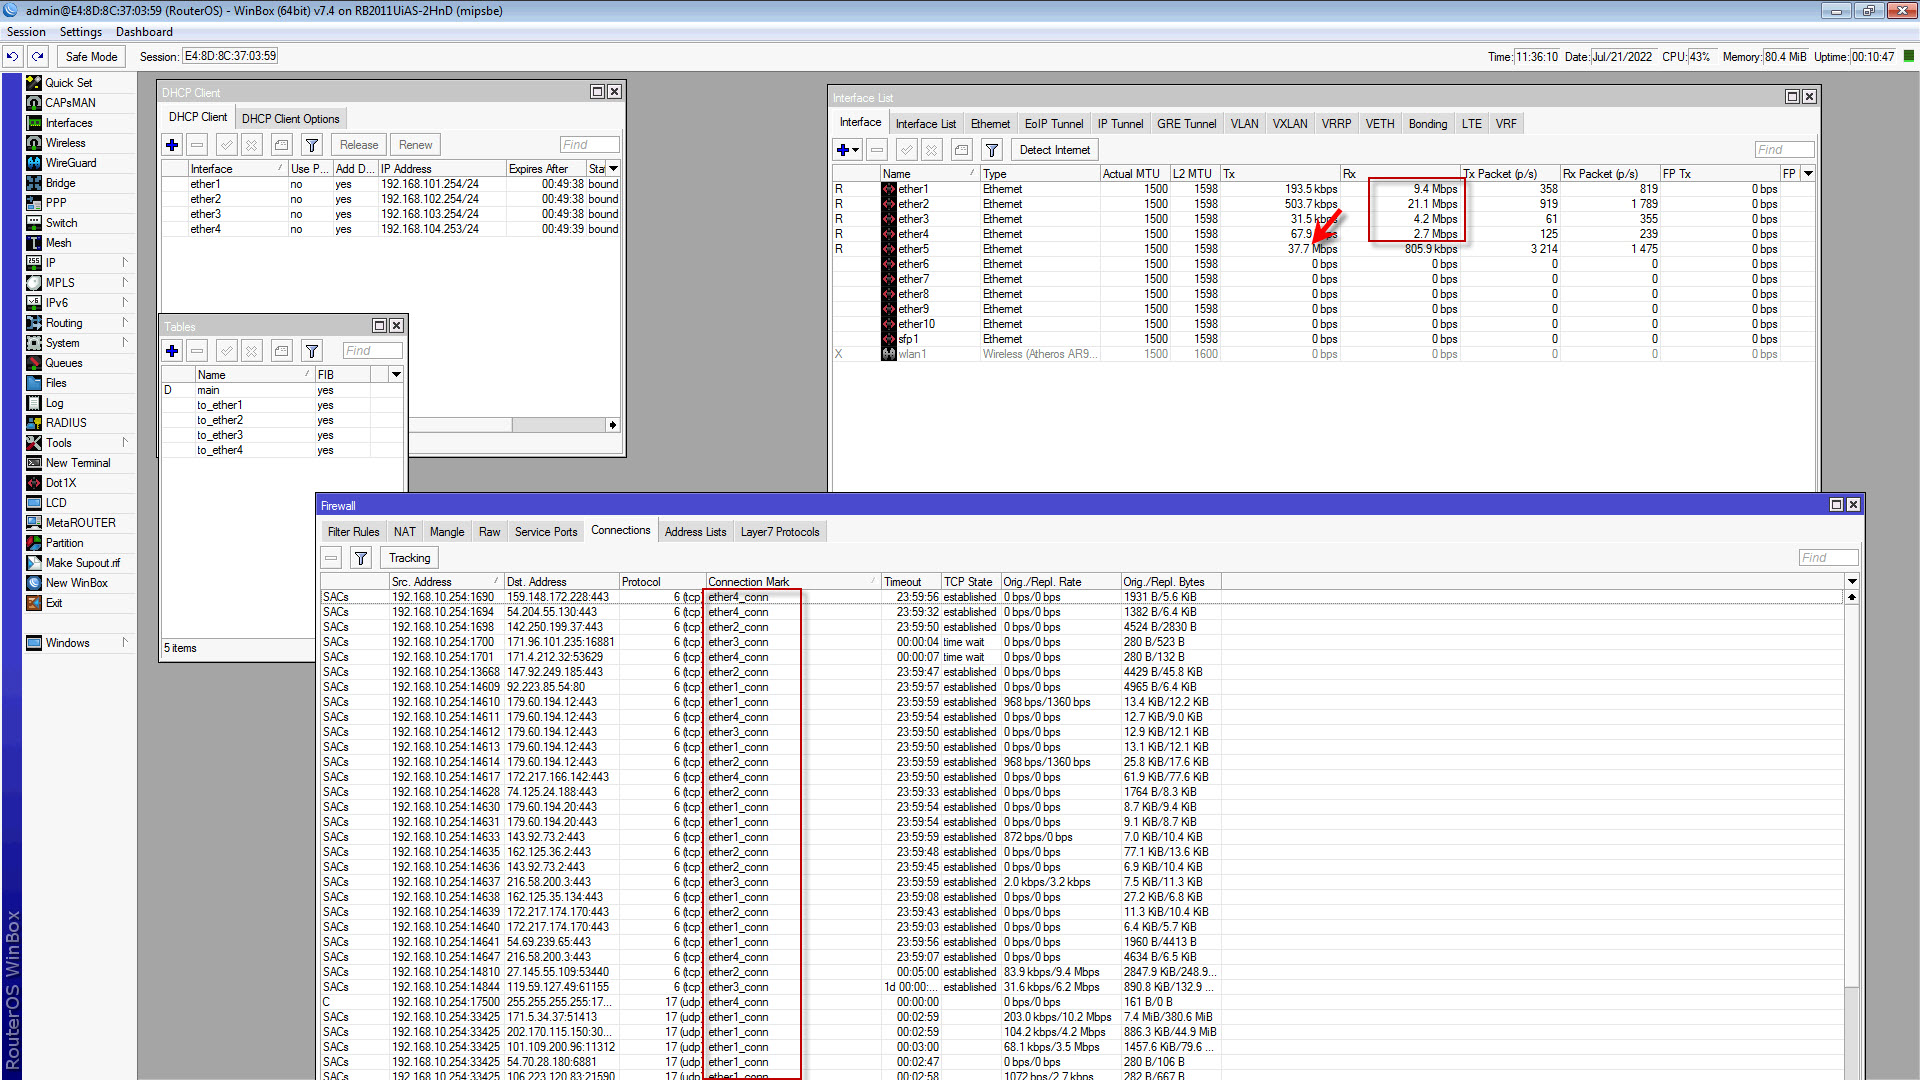
ผมแยกสคริปออกให้เป็นส่วนๆ
ปกติผมจะไม่แก้ไขชื่อ interface และใส่ comment เพื่อให้สคริปท์สั้นและดูง่ายครับ
กรณีคอนฟิกผ่าน serial copy paste ทั้งหมดได้เลย
แต่ถ้าใช้ new terminal ผ่าน winbox คอย paste ทีละส่วน จะง่ายครับ
หรือถ้าจะให้เข้าใจ เซตมือ เพื่อให้รู้ว่าแต่ละคำสั่งแก้ไขอย่างไร
/ip pool
add name=dhcp_pool0 ranges=192.168.10.2-192.168.10.254
/ip dhcp-server
add address-pool=dhcp_pool0 interface=ether5 name=dhcp1

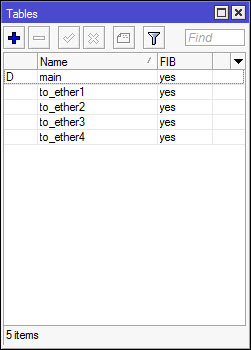
/routing table
add fib name=to_ether1
add fib name=to_ether2
add fib name=to_ether3
add fib name=to_ether4
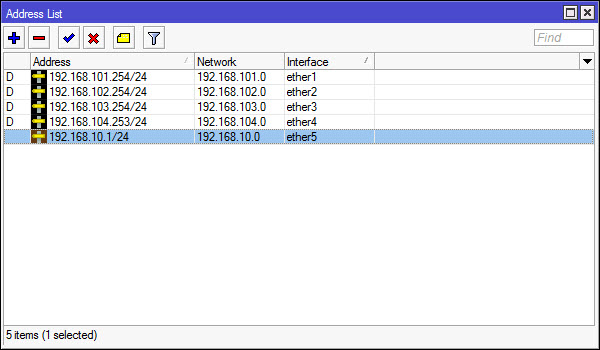
/ip address
add address=192.168.10.1/24 interface=ether5 network=192.168.10.0
ตรงนี้คือ ether5 อย่างเดียวนะครับ
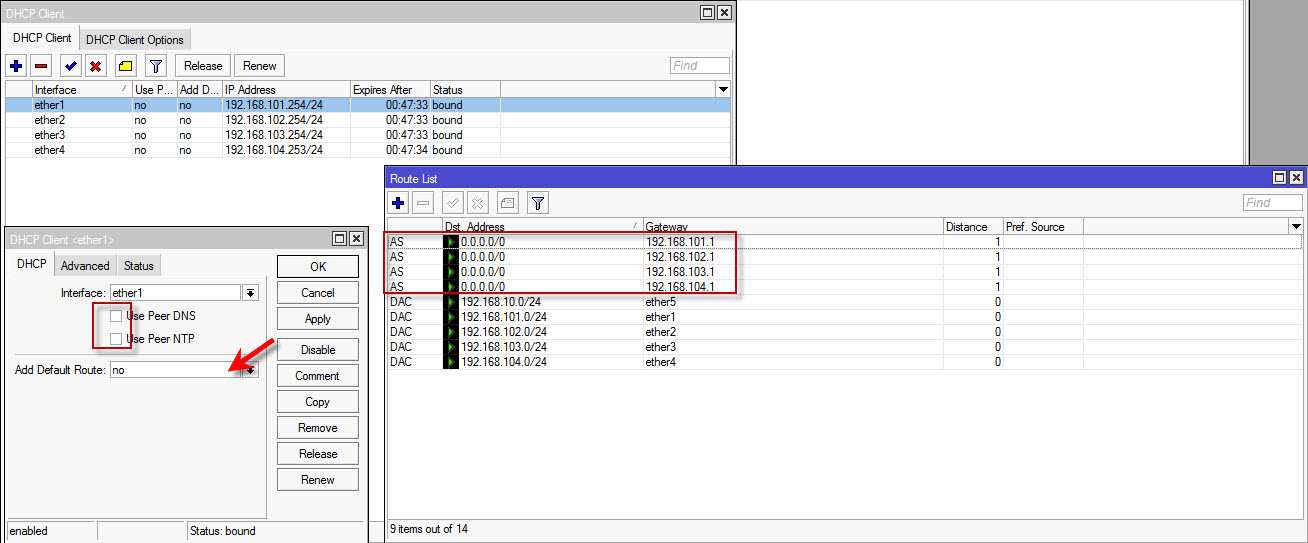
/ip dhcp-client
add add-default-route=no interface=ether1 use-peer-dns=no use-peer-ntp=no
add add-default-route=no interface=ether2 use-peer-dns=no use-peer-ntp=no
add add-default-route=no interface=ether3 use-peer-dns=no use-peer-ntp=no
add add-default-route=no interface=ether4 use-peer-dns=no use-peer-ntp=no
ตรงนี้จะไม่ใช้ Peer DNS และ NTP ครับ
ส่วน Default Route ถ้า Yes มันจะสร้าง Route ให้อัตโนมัติ ถ้า No จะไม่สร้าง
ในรูปนี้คือ No ไม่สร้างครับ
/ip dhcp-server network
add address=192.168.10.0/24 gateway=192.168.10.1
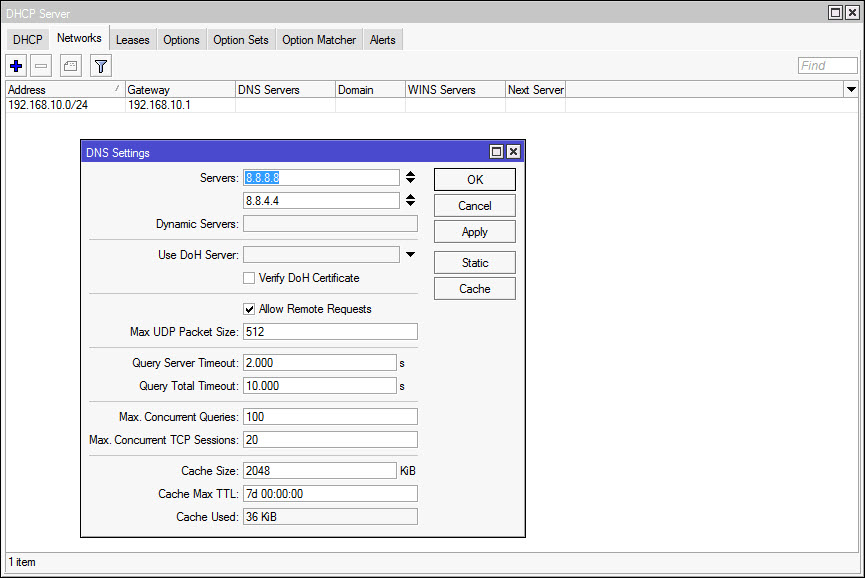
/ip dns
set allow-remote-requests=yes max-udp-packet-size=512 servers=8.8.8.8,8.8.4.4
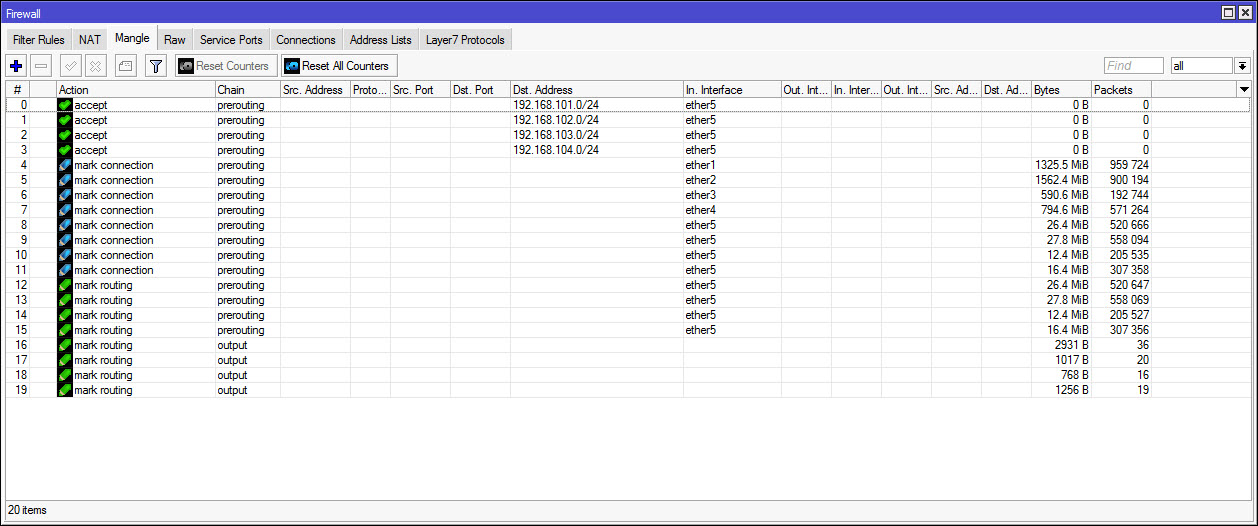
/ip firewall mangle
add action=accept chain=prerouting dst-address=192.168.101.0/24 in-interface=ether5
add action=accept chain=prerouting dst-address=192.168.102.0/24 in-interface=ether5
add action=accept chain=prerouting dst-address=192.168.103.0/24 in-interface=ether5
add action=accept chain=prerouting dst-address=192.168.104.0/24 in-interface=ether5
add action=mark-connection chain=prerouting in-interface=ether1 new-connection-mark=ether1_conn
add action=mark-connection chain=prerouting in-interface=ether2 new-connection-mark=ether2_conn
add action=mark-connection chain=prerouting in-interface=ether3 new-connection-mark=ether3_conn
add action=mark-connection chain=prerouting in-interface=ether4 new-connection-mark=ether4_conn
add action=mark-connection chain=prerouting dst-address-type=!local in-interface=ether5 new-connection-mark=ether1_conn per-connection-classifier=both-addresses-and-ports:4/0
add action=mark-connection chain=prerouting dst-address-type=!local in-interface=ether5 new-connection-mark=ether2_conn per-connection-classifier=both-addresses-and-ports:4/1
add action=mark-connection chain=prerouting dst-address-type=!local in-interface=ether5 new-connection-mark=ether3_conn per-connection-classifier=both-addresses-and-ports:4/2
add action=mark-connection chain=prerouting dst-address-type=!local in-interface=ether5 new-connection-mark=ether4_conn per-connection-classifier=both-addresses-and-ports:4/3
add action=mark-routing chain=prerouting connection-mark=ether1_conn in-interface=ether5 new-routing-mark=to_ether1
add action=mark-routing chain=prerouting connection-mark=ether2_conn in-interface=ether5 new-routing-mark=to_ether2
add action=mark-routing chain=prerouting connection-mark=ether3_conn in-interface=ether5 new-routing-mark=to_ether3
add action=mark-routing chain=prerouting connection-mark=ether4_conn in-interface=ether5 new-routing-mark=to_ether4
add action=mark-routing chain=output connection-mark=ether1_conn new-routing-mark=to_ether1
add action=mark-routing chain=output connection-mark=ether2_conn new-routing-mark=to_ether2
add action=mark-routing chain=output connection-mark=ether3_conn new-routing-mark=to_ether3
add action=mark-routing chain=output connection-mark=ether4_conn new-routing-mark=to_ether4
4 WAN จะมีทั้งหมด 20 แถวครับ
/ip firewall nat
add action=masquerade chain=srcnat out-interface=ether1
add action=masquerade chain=srcnat out-interface=ether2
add action=masquerade chain=srcnat out-interface=ether3
add action=masquerade chain=srcnat out-interface=ether4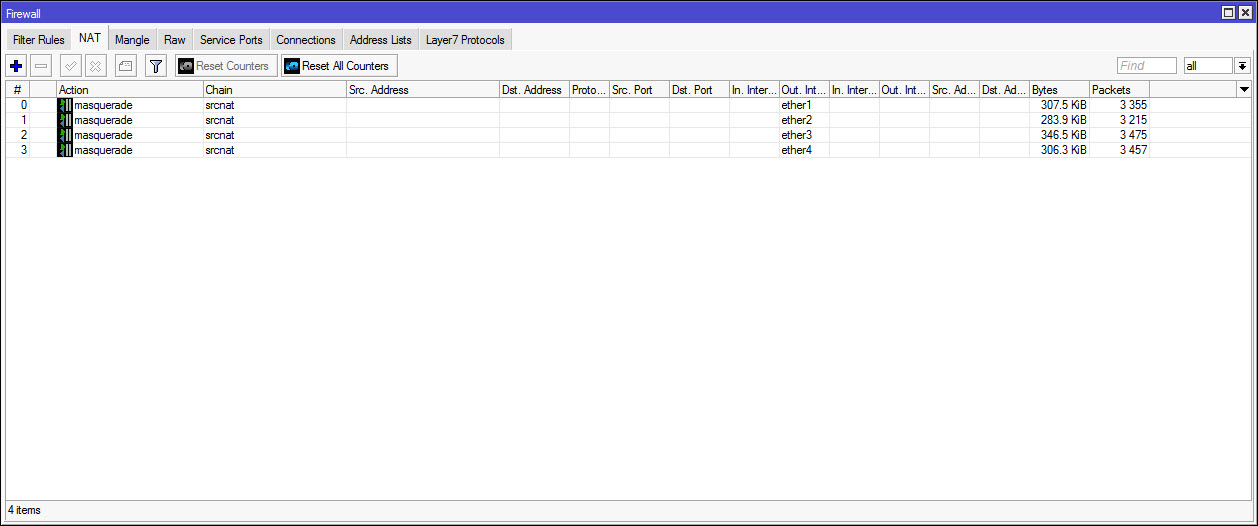
/ip route
add check-gateway=ping disabled=no dst-address=0.0.0.0/0 gateway=192.168.101.1 routing-table=to_ether1
add check-gateway=ping disabled=no dst-address=0.0.0.0/0 gateway=192.168.102.1 routing-table=to_ether2
add check-gateway=ping disabled=no dst-address=0.0.0.0/0 gateway=192.168.103.1 routing-table=to_ether3
add check-gateway=ping disabled=no dst-address=0.0.0.0/0 gateway=192.168.104.1 routing-table=to_ether4